Quick Summary
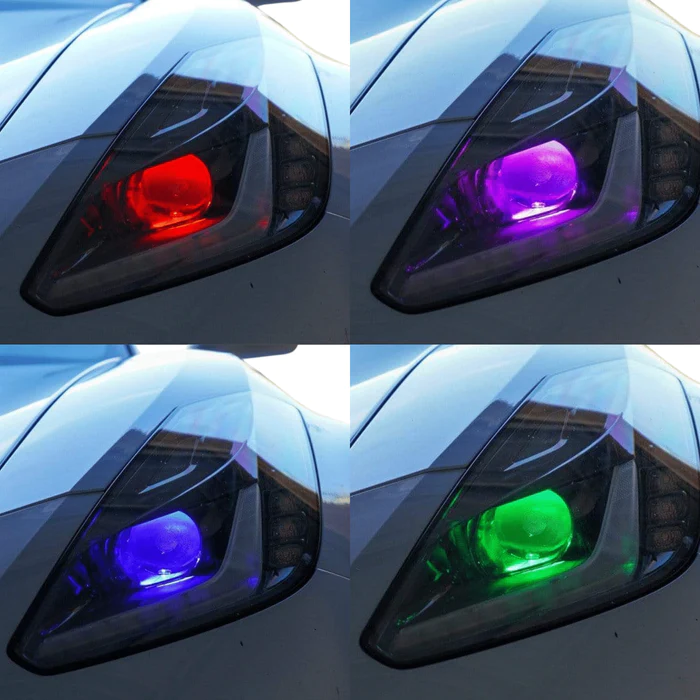
Demon Eyes are small LED accents installed inside projector-style headlights to illuminate the projector lens with a custom multicolor glow.
Demon Eyes are universal-fit, but the installation process can vary depending on the headlight design.
In most installs, the Demon Eye LED is mounted near the projector using one of these methods:
The included mounting bracket
JB Weld or epoxy
A modified version of the Demon Eye bracket
A custom mounting location based on the projector design
The included bracket is optional and may not line up with every projector. Many installs require adjusting, trimming, removing, or modifying the bracket to get the best fit.
RGBW Demon Eyes Info + Install Guide
What Are Demon Eyes?
Demon Eyes are small, high-powered LED accents installed inside projector-style headlights.
They are usually mounted behind or near the projector lens so the LED shines into the projector bowl and illuminates the lens with a custom colored glow.
Demon Eyes are commonly used to create a custom show-car look and can be controlled through the RGB Halo Kits app or controller system, depending on the product version.
What Headlights Are Demon Eyes Compatible With?
Demon Eyes are designed for projector-style headlights.
They are generally compatible with headlights that have a projector lens inside the housing.
Demon Eyes are not compatible with most halogen reflector headlights or non-projector headlights because there is no projector lens for the LED to illuminate properly.
Before installing Demon Eyes, confirm that your headlights have a projector lens.
Important Installation Note
Demon Eyes are universal, but the mounting process is not the same for every headlight.
Every projector and headlight housing is different.
Some headlights have plenty of room above the projector.
Some headlights have very little clearance.
Some projectors have usable screw holes or mounting points.
Others require the Demon Eye to be mounted with JB Weld, epoxy, or a custom method.
Because of this, there is not one single mounting method that works for every vehicle.
The goal is to find the best mounting position based on the projector and headlight design.
How Demon Eyes Are Usually Mounted
The ideal mounting position is usually on top of the projector, with the LED shining down into the projector bowl.
This usually gives the best glow through the projector lens.
However, if there is not enough room above the projector, the Demon Eye may be mounted in another position.
Possible mounting locations include:
- Top of the projector
- Side of the projector
- Bottom of the projector
- Custom position near the projector opening
Top mounting is usually preferred, but side or bottom mounting can be used if the headlight design requires it.
The most important part is making sure the Demon Eye shines into the projector lens without blocking projector movement, projector output, or internal headlight components.
Using the Included Mounting Bracket
Some Demon Eye kits include a general mounting bracket.
This bracket is helpful for some projector designs, but it will not fit every headlight.
The bracket holes may not line up with the projector.
The bracket may not sit at the correct angle.
The bracket may create clearance issues inside the headlight.
Because of this, the included bracket is optional.
If the bracket fits your projector correctly, you can use it.
If the bracket does not fit well, you can remove it, modify it, trim it, or bypass it completely.
When to Modify or Remove the Bracket
In many installs, the black bracket that comes with the Demon Eye may need to be adjusted.
Depending on the headlight, you may need to:
- Trim the bracket
- Cut part of the bracket
- Bend or adjust the bracket
- Remove the bracket completely
- Mount the Demon Eye directly with JB Weld or epoxy
This is normal.
Demon Eyes are universal parts, so the bracket is not guaranteed to line up perfectly with every projector.
The installer should test-fit the Demon Eye and choose the cleanest and most secure mounting method for that specific headlight.
Using JB Weld or Epoxy
Most of the time, we prefer using JB Weld or a strong epoxy to mount Demon Eyes.
This gives the installer more flexibility because the Demon Eye can be positioned exactly where it needs to sit.
We recommend test-fitting the Demon Eye first before applying epoxy.
Make sure the LED is aimed correctly into the projector.
Once the position is correct, secure it with JB Weld or epoxy and allow it to fully cure before reinstalling the headlight lens.
For many installs, JB Weld SteelStik or a similar high-strength epoxy works well.
Basic Demon Eye Install Process
Step 1: Open the Headlight
The headlight must be opened before installing Demon Eyes.
This usually requires heating, cutting, or otherwise opening the headlight housing depending on the headlight design.
Refer to our separate headlight opening guide before starting.
Step 2: Locate the Projector
Once the headlight is open, locate the projector inside the housing.
The Demon Eye should be mounted so the LED shines into the projector lens or projector bowl.
Step 3: Test-Fit the Demon Eye
Before permanently mounting anything, test-fit the Demon Eye.
Check:
- Clearance around the projector
- Hood or shroud clearance
- Lens clearance
- Projector movement, if applicable
- Wire routing
- LED angle
- Whether the included bracket fits or needs to be modified
Do not glue or mount the Demon Eye until you confirm the position works.
Step 4: Choose the Best Mounting Method
Depending on the headlight, choose the best mounting method.
You may use:
- Included Demon Eye bracket
- Modified bracket
- JB Weld or epoxy
- Custom mounting point
- Existing hole on the back of the Demon Eye unit, if usable
The included bracket is not required if it does not fit properly.
Step 5: Mount the Demon Eye
Mount the Demon Eye securely in the chosen location.
Preferred placement is usually on top of the projector.
If top mounting is not possible, mount it to the side or bottom of the projector as needed.
Make sure the LED shines into the projector and does not block any projector function.
Step 6: Route the Wiring
Route the Demon Eye wiring cleanly through the headlight housing.
Keep the wiring away from:
- Projector cutoff shield movement
- Hot projector areas
- Sharp metal edges
- Pinch points
- Any moving internal parts
Use a rubber grommet, cable gland, or sealed pass-through if wiring exits the headlight housing.
Step 7: Connect to the Correct Controller or LED Driver
RGBW Demon Eyes should connect to the correct RGBW controller or included LED driver setup.
Do not connect Demon Eyes directly to vehicle power and ground.
Do not connect RGBW Demon Eyes to a Flow Series controller.
Do not connect Flow Series Demon Eyes to an RGBW controller.
Use the wiring setup included with your specific product.
Step 8: Test Before Resealing
Before resealing the headlight, test the Demon Eyes.
Check that:
- Both Demon Eyes power on
- Colors change correctly
- App or remote control works
- Wiring is not loose
- The LED glow is aimed correctly into the projector
- Nothing is blocking the projector or headlight function
Once everything is tested, reseal the headlight properly.
Best Mounting Position
The best Demon Eye mounting position is usually:
Above the projector, shining downward into the projector lens.
However, this depends on the headlight.
If there is no room above the projector, you may mount the Demon Eye:
- On the side of the projector
- Below the projector
- In another secure location near the projector
The correct position is the one that gives the best glow, fits safely, and does not interfere with the projector or headlight assembly.
Common Installation Issues
The included bracket does not line up
This is common.
The bracket is universal and may not align with every projector.
Modify the bracket, remove it, or mount the Demon Eye with JB Weld or epoxy.
There is no room above the projector
Mounting above the projector is preferred, but not always possible.
Use the side or bottom of the projector if needed.
The Demon Eye does not shine evenly through the lens
The LED angle may need to be adjusted.
Test-fit the Demon Eye and adjust the position before final mounting.
The Demon Eye is loose after mounting
The mounting surface may not have been clean, or the epoxy may not have fully cured.
Clean the surface, remount securely, and allow the adhesive to cure fully.
The Demon Eye does not turn on
Check that:
- The Demon Eye is connected to the correct LED driver or controller
- The controller has power and ground
- The LED driver is connected, if included
- The connector is fully seated
- The product is not connected to the wrong controller type
Important Notes
Demon Eyes are universal-fit, so installation varies by vehicle.
The included mounting bracket is optional.
Most installs require test-fitting and custom positioning.
JB Weld or epoxy is commonly used for a secure mount.
Top mounting is preferred, but side or bottom mounting is acceptable when needed.
Do not block the projector lens, cutoff shield, or projector movement.
Do not connect Demon Eyes directly to vehicle power.
Do not mix RGBW and Flow Series controllers.
Always test before resealing the headlight.
Where Can I Find This Product?
RGB Halo Kits offers multiple Demon Eye options, including:
Choose the product version that matches your lighting setup and controller type.
Final Recommendation
Demon Eye installation is all about test-fitting and choosing the best mounting method for the specific headlight.
The included bracket may work on some projectors, but many installs require modifying the bracket or using JB Weld to mount the Demon Eye securely.
Whenever possible, mount the Demon Eye above the projector and aim it downward into the projector lens.
If that is not possible, mount it to the side or bottom of the projector as long as the LED is secure, aimed correctly, and does not interfere with headlight function.
Comments
0 comments
Article is closed for comments.